
How I Measure Time in Char Siu Baos

When it comes to Chinese pork buns, there is BM and there is AM.
BM as in “Before Microwaves,” before those boxy, miracle appliances became standard on our kitchen counters. And AM as is in “After Microwaves,” when we realized we couldn’t live without the darn things.
Those two periods in time had a profound effect on how I ate my delicious pork buns.
I’ve always enjoyed both the shiny, golden baked pork buns, as well as the fluffy, white steamed ones at many a dim sum restaurant.
My parents often bought some home, too, tied up in a pink square box.
BM, those were always the steamed buns that nestled in our fridge, never the baked ones. Lacking a toaster oven, my parents thought it a wasteful use of electricity to turn on the oven just to warm up a couple of small pork buns.
But the steamed ones were easy enough to handle by just placing them in a steamer on top of the stove. It took a little time to heat up the burner, to get the water boiling and the steam to penetrate the baos, but in those BM days, it seemed more than fast enough.
As a kid getting ready for school, I often awoke before my parents did. It would be my job in the morning to turn on the stove to get the kettle boiling for their coffee, and to take a couple of buns out of the fridge to place in the steamer for our breakfast. Bread-like, filled with sweet chunks of barbecued pork, and warm enough to make your fingers feel toasty on foggy San Francisco mornings, it was a perfect wake-me-up meal at that bright-eyed hour.
I can’t remember when we got our first microwave. But I do remember that AM, we sure seemed to have a lot more baked buns in the house. After all, warming them up in the newfangled microwave was a cinch, even if you had to sacrifice crispy tops in the process.
Nowadays, I still enjoy both steamed and baked varieties. My husband, though, swears his allegiance to the baked ones. I’m not sure if it’s because, as in my case, they became more ubiquitous in his household AM. All I know is that when I told him I was going to try making my very own baked char siu baos, he lit up like, well, metal sparking in the microwave.
Good pork buns can have that effect on people.

And these are no exception. The recipe is from my good friend, Andrea Nguyen whose new book, “Asian Dumplings” (Ten Speed Press) was just named a finalist for an IACP cookbook award. (Wooo, you go, girl!)
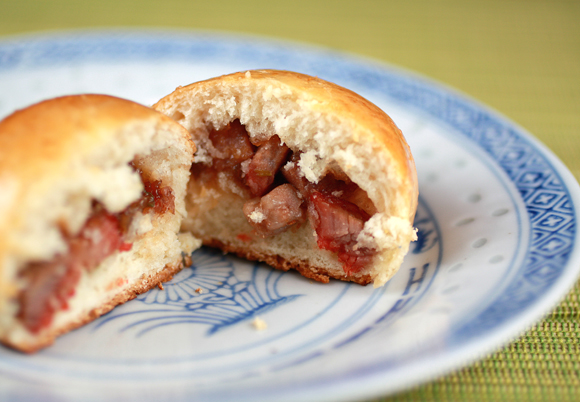
The filling is easy enough to make, especially if you use store-bought Chinese barbecued pork. You dice it, and combine it with a thick sauce flavored with soy sauce, oyster sauce, and white pepper.
The yeasted dough for the buns gets enriched with egg, whole milk and butter. Unlike the overly squishy texture of so many purchased buns, these have more the characteristics of bread, with a certain sturdiness to them. Indeed, Andrea likens them to challah. Once they’re baked, they get brushed with a honey glaze that softens them and gives them an irresistible sweetness and shine.
Whether you grew up eating your pork buns BM or AM doesn’t matter. Once you try these freshly made ones out of the oven, there’s a good chance there won’t be any left to even worry about heating them up again.
Char Siu Pork Bun Filling
(Makes 1 1/3 cups)
For flavoring sauce:
1 tablespoon sugar
1 pinch of white pepper
1 tablespoon light (regular) soy sauce
2 teaspoons oyster sauce
1 tablespoon water
For rest of filling:
2 teaspoons canola oil
2 scallions (white and green parts), chopped
1/2 pound store-bought char siu pork, diced
1 tablespoon Shaoxing rice wine or dry sherry
1 1/2 tablespoons cornstarch dissolved in 2 tablespoons water
To make the flavoring sauce, combine sugar, white pepper, soy sauce, oyster sauce, and water in a small bowl. Stir to dissolve sugar and set aside.
Heat oil in a medium skillet over medium heat. Add scallions and cook, stirring constantly, for about 30 seconds, or until aromatic, and slightly softened. Add pork and combine well. Add flavoring sauce and cook, stirring frequently, for about 2 minutes, or until pork is heated through.
Meanwhile, add rice wine to dissolved cornstarch. When pork is hot enough, add wine and cornstarch mixture. Cook for another 30 seconds, stirring constantly, until mixture comes together into a mass that you can mound. Transfer to a bowl and set aside to cool completely before using. (The filling can be prepared up to 2 days in advance, covered with plastic wrap, and refrigerated. Return to room temperature before using.)

Baked Filled Buns
(Makes 32 small or 16 medium buns)
For the dough:
10 tablespoons whole milk
4 tablespoons butter or canola oil
2 teaspoons rapid-rise (instant) dry yeast
2 1/2 tablespoons lukewarm water
1 large egg
2 1/2 tablespoons sugar
12 1/2 ounces (2 1/2 cups) bleached or unbleached all-purpose flour, plus more as needed
For filling:
1 1/3 cups char siu pork bun filling (from recipe above)
1 large egg, lightly beaten
2 tablespoons honey mixed with 1 tablespoon warm water
For the dough, melt butter with milk in a saucepan over medium heat. Set aside to cool for about 5 minutes, or until warm (about 110 degrees). If using oil, combine it with milk and heat until warm.
Put yeast in a small bowl, add water, and set aside for 1 minute to soften. Whisk in the milk mixture and the egg to blend.
Combine sugar and flour in a food processor. Pulse two or three times to blend. With the machine running, pour yeast mixture through feed tube in a steady stream. After a sticky mass of very soft dough forms, about 5 seconds, continue processing for 45 to 60 seconds to form a smooth, slightly sticky dough that mostly cleans the bowl. The finished dough should stick a bit to your fingers when pressed.
Alternately, to make the dough by hand, combine sugar and flour in a large bowl. Make a well in the center and pour in the yeast mixture. Slowly stir with a wooden spoon to work in all the flour. (Add water by the teaspoon if this doesn’t happen with relative ease.) Keep stirring as a ragged, soft mass forms. Then use your fingers to gather and pat the dough into a ball. Transfer to a work surface and knead for about 5 minutes, or until smooth, fingertip soft, and slightly elastic. (You should not need any additional flour on the work surface if the dough was properly made. Keep kneading and after the first minute or two, the dough should not stick to your fingers. If it does, work in a sprinkling of flour.) Press your finger into the dough; it should spring back, with a faint indentation remaining.
Regardless of the mixing method, lightly oil a clean bowl and add dough. Cover with plastic wrap and put in a warm, draft-free place (for example, the oven with the light on) to rise for about 45 minutes, or until nearly doubled. (Or punch the dough down after rising, cover with plastic wrap, and refrigerate overnight. Return dough to room temperature before using.)
Line 2 baking sheets with parchment paper before beginning to assemble the buns.
Remove the dough from the bowl and put it on a lightly floured surface. Knead it a few times, then cut it in half. Cover one-half with plastic wrap or an inverted bowl to prevent drying.
Roll dough into a 12-inch log and then cut it into 8 or 16 pieces for medium or small buns, respectively. (Halve or quarter the log to first make it easier to cut even-size pieces. The tapered end pieces should be cut a little longer than the rest.) Lightly roll each piece between your hands into a ball and then flatten each one into a 1/4-inch-thick disk.
Use a wooden dowel-style rolling pin to roll pieces into circles, about 2 1/2 inches in diameter for small or 3 1/4 inches in diameter for medium buns. The rim should be thinner than the center; keep a 1-inch-wide belly. The finished circle will rise as it sits. Lay the finished circles out on your work surface, lightly dusting their bottoms with flour if you fear they will stick.
To form a bun, hold a dough circle in a slightly cupped hand. Use a spoon or fork to center about 2 teaspoons of filling for small buns, or about 4 teaspoons of filling for medium ones, on the dough circle, pressing down very gently and keeping about 1/2 to 3/4 inch of the dough clear on all sides; your hand will automatically close slightly. Use the thumb of the hand cradling the bun to push down the filling while the other hand pulls up the dough edge and pleats and pinches the rim together to form a closed satchel. Pinch and twist the dough closed at the end.
Place the bun pleat side down on the prepared baking sheet. Repeat with remaining dough circles, spacing them 1 1/2 inches apart on the baking sheet. Loosely cover with plastic wrap or a kitchen towel. Set in a warm, draft-free place (for example, the oven with the light on) for 30 minutes to rise. Meanwhile, work on the other dough half to form more buns.
To bake the buns, about 10 minutes before the rising time is over, position a rack in the middle of the oven and preheat to 350 degrees. (Let the buns finish rising at room temperature if you’ve had them in the oven.)
Bake one baking sheet at a time, brushing the top and side of each bun with the egg right before baking. Bake small buns for about 14 minutes and medium buns for about 18 minutes, or until a rich golden brown; the cooked buns sound hollow when tapped on the bottom. Remove them from the oven, set on a rack, and let cool for 5 minutes.
Brush the honey mixture on the buns for a sweet-glaze finish that will also soften the crust. Enjoy warm and out of hand. Refrigerate leftover buns for up to a week and reheat at 350 degrees for 8 to 10 minutes, until hot. When making the buns in advance, wait to brush on the glaze until after you’ve reheated the buns. These buns also may be frozen for up to a month. Thaw them completely before reheating.
From “Dumplings” by Andrea Nguyen
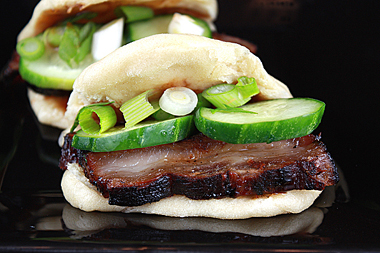
More bun fun: Make Momofuku’s famous pork buns
Thanks so much for sharing the story & the recipe! These buns look so scrumptious and I can’t wait to try them!
The buns sound and look amazing! And I always love to read about your childhood… I love how food brings back so many memories…
Sometimes I wonder if I could live without a microwave, but there are a lot of conveniences to life AM! The golden, baked buns look fantastic.
Wow. Very impressive! Love reading about your childhood too. I like both kinds of buns though my family was generally more of a steamed bun kind of family. Either would be great for breakfast–right now!!
Oh, yummy! Those look really good! Nice filling. I love Chinese Baos!
cheers,
Rosa
These look so yum. I love how you’ve categorized it as BM and AM 😀 I’m still a BM pork bun girl I think. It’s always the fluffy soft steamed types for me. always. x
These remain my favorite breakfast too. Where would you buy your storemade ones? I’m also looking for a good source for the pork in SF along the Clement street area, if you have any ideas I would appreciate it very much!
I’m more partial to the steamed buns because the baked ones always seemed a bit too sweet for me with the glaze. But I’m impressed you made them at home. That seems like a lot of effort. Meat Boy must be so happy!
awesome post…love them both ways…but, contrary to Single Guy Ben, I have a insatiable sweet tooth…the glazed baked jewels of Chinese love are my favorites…just had a really good one from Chinatown in NYC, bought them for New Years (my two daughters are from China…so we incorporate lots of their customs into our home).
My love of the pork bun is incredibly deep rooted…. psychological and pyshical…
lit up like metal in the microwave, eh? apt analogy. 🙂
this is a wonderful read, carolyn. i’m not very familiar with pork buns at all, but i’ll be darned if it doesn’t look quite delectable. methinks i’d like it either way!
Where would one find store-bought char siu pork?
Wow….your char siu pao looks really delicious! I love char siu pao…..both the steamed and baked types.
Love pork buns, but I am spoiled as we have an awesome Chinese bakery less than a block a way. We also have a code – “I need mail a letter” means hitting the bakery on the way to the mail box.
I have been eying this recipe in my copy of Asian Dumplings but have not had the opportunity to give them a try. I cannot wait, but think they would be so much more fun to make with a friend.
You guys can buy pork buns at most any restaurant that serves dim sum. Also, Asian bakeries usually sell them, too. And perhaps OysterCulture can be talked into spilling the beans on the name of her favorite Chinese bakery? I think we all should goad her into it. 😉
I’m also for BM bun. Love it moist and fluffy. Well, I do the AM thing too but with a water tray in the M – so it is like re-steaming and avoiding dryness in the flour. Kekeke….
I can’t be much younger than you but I seriously don’t remember the BM days. I love the steamed chari sui baos though and always buy a few whenever I go to an Asian supermarket with my mom! Can’t beat that 3 fo $1 deal!
this looks gorgeous and great for breakfast!
These are so cute and yummy-looking!!
I appreciate how hard you work…this is a wonderful post..the story, the recipe and cooks tips…and the photography. Thanks C. 🙂
Delicious, I can’t wait to give these a go. Thanks for sharing.
Mrs. L: You can find char siu sold at Asian markets such as 99 Ranch. Also, some mom-and-pop-type Asian delis also sell it.
wow, that looks like a feat!! I love dim sum and I absolutely love char xiu bao!
thanks for sharing and i might eventually attempt it when I find the courage! stunning photos by the way!
These look amazing and I love pork buns so I WILL be trying them. Getting up before your parents and getting everyting started – seems you were always a lovely person.
Your words bring visuals, I almost see how you form a bun : ).
Wow, these look amazing!! I’d love to have one right now!!
A bakery in mountain view (bout a couple blocks of the caltrain) called Hongkong bakery (or something along those lines) has pretty amazing baked versions.
Pricey but pretty large and worth it.
dang foodgal, those look so beautiful! How long did it take start to finish I wonder?
Foodhoe: It wasn’t that time-consuming making these — especially because there are only 16 buns to make in Andrea’s recipe, unlike the 50 — YES, 50 (!!!) buns — in the David Chang pork bun recipe. 😉
Pingback: Food Gal » Blog Archiv » Memories of Childhood Chinese Chicken