
Pure Pizza Dough Heaven — The Recipe From Pizzeria Mozza

Hands down, this is the best pizza dough recipe — ever.
I don’t say that lightly, either. And believe you me, I’ve tried many others, some quite good.
But the one from “The Mozza Cookbook” (Alfred A. Knopf) by baker extraordinaire, Nancy Silverton, and her chef, Matt Molina, and food journalist Carolynn Carreno, is truly astounding.
It’s got so much character and developed flavor that I could eat the crust plain. How many pizza crusts can you say that about?

As Silverton explains in the new cookbook, of which I recently received a review copy, it’s not an exact replica of the one served at her Pizzeria Mozza in Los Angeles that she owns with Mario Batali and Joe Bastianich. But having enjoyed the real deal at Mozza every time I’ve visited Los Angeles, I can attest that the recipe in the book makes a pretty darn close approximation to the pizzas that come out of the restaurant’s ferociously hot wood-fired ovens.
They both sport one of the most varied crusts around — at times crisp, chewy and airy. Each bite of crust brings a new texture — from the edges, which puff up in the blistering heat of the oven, to the patchwork of air holes like that of a wonderful ciabatta to the cracker-like center. The flavor is that of a great artisan bread. And no wonder since Silverton practically single-handedly started the gourmet bread trend in Los Angeles when she opened her landmark La Brea Bakery.
I’ve loved this pizza crust from the first time I ever sank my teeth into it years ago in Los Angeles. I can’t be more thrilled to know that I can duplicate it at home now, too.
The difference is that the restaurant version is made with a sponge that ferments far longer than the one in this home-version, which takes only 90 minutes. Still, it’s amazing the complex flavor that develops in just that short amount of time.


Silverton recommends using a scale to weigh your ingredients for precision. You combine water, yeast, bread flour, rye flour and wheat germ, then let it do its thing for 90 minutes. Next, you add more water, more bread flour, honey and salt, then let the dough proof for another 2 1/2 hours or so, before it’s ready to be shaped and baked.
The dough is a little tricky to work with at the start. It’s not your usual dense ball of dough. Instead, it’s rather flabby and soft. In fact, you will see big air bubbles form as it proofs, much like when you make ciabatta dough. As a result, the dough will start to cascade over your hand the moment you pick it up. It doesn’t take much effort to pat it out into a thin round. In fact, you have to take care not to let it get too thin in the center.

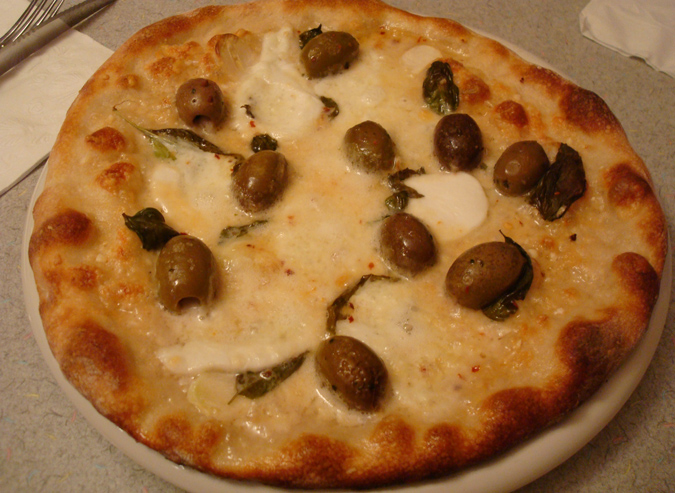
Since the clam pizza at Mozza is one of my favorites, that’s the topping recipe I went with. For each pizza, you’ll need about 1 pound of littleneck clams. The ones we bought were a little small, so next time I’d up the amount of clams a bit.
The clams are cooked with water in a saucepan, then shucked. The clams are combined with garlic and olive oil to make the topping that gets strewn over the unbaked crust. We baked our pizza on a pizza stone in our Big Green Egg heated to about 625 to 650 degrees. It was done in 4 minutes tops.
Once the pizza is cooked, scatter dried oregano, grated Parmigiano, grated percorino romano, parsley leaves and red pepper flakes over the top before serving.
Plunge in — and prepare to weep with utmost pizza joy.

Nancy’s Pizza Dough
(Makes enough dough for 6 pizzas; each pizza serves one)
22 ounces warm tap water (2 cups, 6 ounces)
1/2 ounce (1 tablespoon) compressed yeast or 1 teaspoon active dry yeast
26 ounces unbleached bread flour, plus more as needed
1/2 ounce (1 tablespoon) dark rye flour or medium rye flour
1 1/2 teaspoons wheat germ
1 1/2 teaspoons barley malt or mild-flavored honey, such as clover or wildflower
1/2 ounce (1 tablespoon) kosher salt
Olive oil, grapeseed oil, or another neutral flavored oil, such as canola oil, for greasing the bowl
To make the sponge, put 15 ounces of water and the yeast in the bowl of a standing mixer and let it sit for a few minutes to dissolve the yeast. Add 13 ounces of the bread flour, the rye flour, and the wheat germ. Stir with a wooden spoon to combine the ingredients. Wrap the bowl tightly in plastic wrap and tightly wrap the perimeter of the bowl with kitchen twine or another piece of plastic wrap to further seal the bowl. Set the dough aside at room temperature (ideally 68 to 79 degrees) for 1 1/2 hours.
Uncover the bowl and add remaining 7 ounces of water, the remaining 13 ounces of bread flour, and the barley malt. Fit the mixer with the dough hook, place bowl on the mixer stand, and mix the dough on low speed for 2 minutes. Add salt and mix on medium speed for 6 to 8 minutes, until dough starts to pull away from the sides of the bowl. Note that the dough will not pull so much that it completely cleans the bowl, but if the dough is too sticky and is not pulling away from the sides at all, throw a small handful of flour into the bowl to make it less sticky. While the dough is mixing, lightly grease with olive oil a bowl large enough to hold the dough when it doubles in size. Turn the dough out of the mixer into the oiled bowl. Wrap the bowl as before. Set dough aside at room temperature for 45 minutes. Dust your work surface. Acting as if the round has four sides, fold the edges of the dough toward the center. Turn the dough over and return it, folded side down, to the bowl. Cover the bowl again with plastic wrap and set it aside for 45 minutes.
Dust your work surface again lightly with flour and turn the dough out onto the floured surface. Divide the dough into six equal segments, each weighing approximately 7 ounces. Gently tuck the edges of each round of dough under itself. Cover the dough rounds with a clean dishtowel and let them rise for 5 minutes.
Lightly flour your hands and use both hands to gather each round of dough into a taut ball. Dust a baking sheet generously with flour and place dough rounds on the baking sheet. Cover the baking sheet with the dishtowel and set them again at room temperature for 1 hour to proof the dough. (Or leave the dough on the counter to proof instead.)
To assemble and bake your pizzas: Prepare your topping ingredients.
Remove oven racks from the oven and place a pizza stone on the floor of the oven.
Preheat oven and the stone to 500 degrees, or as hot as your oven will go, for at least 1 hour. In a pinch, use the underside of a thick baking sheet (don’t use a nonstick one).
Create a pizza station that includes bowls full of olive oil, kosher salt and other necessary ingredients. Have a bowl of flour ready for dusting your countertop. Have a bowl of semolina ready for dusting your pizza peel.
When your dough is ready, generously flour your work surface and place one round of dough in the center of the floured surface. Dust the dough lightly with flour. (If you haven’t already, right about now you will want to pour yourself a glass of wine.)
Using your fingertips as if you were tapping on piano keys, gently tap on the center of the dough to flatten it slightly, leaving a 1-inch rim untouched.
Pick up the dough, ball both of your fists, and with your fists facing your body, place the top edge of the dough on your fists so the round stretches downward against the backs of your hands, away from them.
Move the circle of dough around your fists like the hands of a clock so the dough continues to stretch downward into a circle.
When the dough has stretched to about 10 inches diameter, lay it down on the flour-dusted surface.
Brush the rim of the dough with olive oil and sprinkle kosher salt over the surface of the dough.
Dress the pizza how you have chosen, making sure to leave a 1-inch rim with no sauce or toppings around the edge.
Dust a pizza peel with semolina and slide the pizza peel under the pizza with one decisive push. You are less likely to tear or misshape the dough with one good push of the peel than several tentative pushes. Reshape the pizza on the peel if it has lost its shape. Shake the peel gently to determine whether the dough will release easily in the oven. If it is sticking to the peel, carefully lift one side of the dough and throw some more semolina under it. Do this from a few different angles until there is semolina under the entire crust.
Open the oven door and slide the dough onto the preheated stone. Again moving decisively, pull the peel toward you to leave the pizza on the stone.
Bake the pizza until it is golden brown and the rim is crisp and blistered, 8 to 12 minutes. Cooking times vary depending on the power of your oven.
While the pizza is in the oven, clear a space on a clean, dry cutting board or place an aluminum pizza round on the counter to put the baked pizza on.
When the pizza is done, slide the peel under the crust, remove it from the oven, and place it on the cutting board or round.
Use a rolling pizza cutter to cut the pizza.
Repeat.
From “The Mozza Cookbook” by Nancy Silverton
Littleneck Clams, Garlic, Oregano, Parmigiano-Reggiano, and Pecorino Romano Pizza Topping
(Makes enough for 1 pizza; serves 1)
For the clams:
20 littleneck clams (about 1 pound)
1 garlic clove, chopped
2 tablespoons extra-virgin olive oil
For the pizza:
1 round of Nancy’s Pizza Dough (see recipe above)
1 tablespoon extra-virgin olive oil
Kosher salt
1 heaping tablespoon thinly sliced fresh Italian parsley leaves or whole fresh oregano leaves
1 teaspoon dried oregano (preferably Sicilian on the branch)
Wedge of Parmigiano-Reggiano, for grating
Wedge of pecorino romano for grating
1/4 teaspoon red pepper flakes
Finishing-quality extra-virgin olive oil, about 1 tablespoon
To prepare the clams, put them in a small saute pan or saucepan with 1 cup of water over high heat. Cover the pan, reduce the heat to medium, and cook the clams until they steam open, 3 to 4 minutes. Turn off the heat and remove the clams from the juice, discarding any clams that didn’t open. Discard the juice, shuck the clams, and discard the shells. Drain clams in a colander and let them sit in the colander to release excess liquid for about 5 minutes. Transfer clams to a small bowl. Stir together the garlic and the oil. Add half of the oil-garlic mixture to the clams, reserving remaining mixture to dress the pizza, and stir to coat the clams with the seasonings. You can prepare the clams up to this point up to several hours in advance. Transfer clams to an airtight container and refrigerate until you are ready to use them.
To make the pizza, prepare and stretch the dough and preheat the oven, according to instructions in other recipe above.
Brush rim of the dough with the olive oil and season the entire surface with salt. Add a pinch of the sliced parsley or oregano leaves to the bowl with the clams and stir to combine. Spread the remaining tablespoon of the oil-garlic mixture over the pizza, leaving a 1-inch rim without any oil. Scatter clams over pizza, slide the pizza into the oven, and bake until the crust is golden brown, 8 to 12 minutes. Remove pizza from the oven and cut into quarters. Sprinkle dried oregano over pizza, and use a microplane or another fine grater to grate a light layer of Parmigiano-Reggiano and another of the pecorino romano over the surface. Sprinkle red pepper flakes and remaining parelsy or oregano leave over the pizza, drizzle with finishing-quality olive oil, and serve.
From “The Mozza Cookbook” by Nancy Silverton

More: My Meal at Pizzeria Mozza
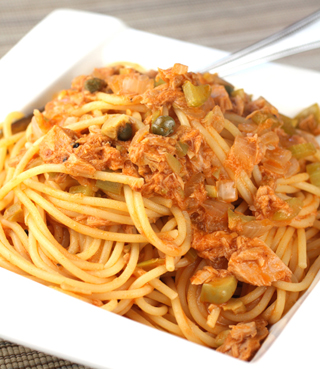
Another Favorite Nancy Silverton Cookbook Recipe: Spaghettini with Tuna and V8 Sauce From Hiro Sone and Lissa Doumani of Terra Restaurant
A Different Dough: Delfina’s Pizza Dough Recipe
And Another: A16’s Neopolitan-Style Pizza Recipe
Amazing! That pizza must taste divine. Another book I have to add to my list of books to buy…
Cheers,
Rosa
I’ll definitely be giving this one a try.
That pizza sounds dangerously good! I haven’t made pizza dough in a long time. When I make it again, it will be this one!
I think it says a lot when you can eat the pizza crust by itself. I sure cant say that about too many let alone even a few. I will give this a try 🙂 The photos are stunning by the way and thanks for sharing this recipe post Carolyn!
Whoa, the hubby will die when he reads this post. You know how he loves his pizza. 🙂
I love Mozza and am so excited for this cookbook – and this pizza!! I don’t have a pizza stone or a very good oven at the moment but I’m going to figure out a way to make it work.
What a yummy recipe!
Ooh that is a big claim but I’m more than willing to believe you because I know you know your stuff! 😀
I make homemade pizza dough and pizza almost every week but boy mine never looks this good! Wow! I am really going to try this fabulous crust! And I love clams, love them. Great great topping. Would so love to see this book.
What a fabulous pizza! Stephen thinks HE has the best pizza dough recipe, but we might try this before I give him the title 😛
I’ve heard nothing but good things about Mozza pizza, I’m so glad that you have done so much research on the subject! What do you think of the cookbook?
I am so enamored with a great pizza crust. I usually use my bread machine and recently found out that the “dough” cycle makes better pizza dough than the “pizza dough” cycle. I also have heard about letting it rise overnight, but so nice to know that you can get a great crust without the wait. Thanks for this post!
This is a must try. I’m already a big fan of Nancy Silverton, so I have to try her pizza dough, and these toppings look perfect. I’m now starving for pizza in the middle of the afternoon!
Wow, what a beautiful pizza. I love La Brea’s bread, so I can imagine how wonderful the pizza crust must be. And clam pizza? Nice choice to make. I’ve never thought about making pizza dough but this looks like the recipe to make if I do take on the challenge.
i think a good pizza dough should fit the word ‘supple’ in its unbaked form, and that ball of dough certainly does. lovely!
Yum, does it come compare to Arizmendi’s pizza dough?
Oh my goodness! What a delicious recipe. Sounds like an amazing pizza dough and topping that I must try.
I had a seafood pizza in Hong Kong’s Pizza Hut years ago and still miss the flavor! I’m definitely going to try your recipe this coming weekend. 🙂 Thanks for sharing.
I love the new Mozza cookbook but I have to admit to falling on my face trying to make the pizza dough. I’m finding it too wet and sticky to work with. Seriously, it’s like paste. Any suggestions?
Tim Smith: My husband and I found that just patting it out on the board, rather than trying to stretch it by laying the dough over your fists worked better. Also, I froze four of the dough balls, since we had other plans and couldn’t eat them all in one or two days. Weeks later, when I defrosted the dough balls in the refrigerator over two days, then let the dough come to room temperature on my kitchen counter for about two hours, the dough had firmed up a little, making it easier to handle.
Pingback: Food Gal » Blog Archiv » Just in Time For Thanksgiving — New La Brea Bakery Stuffing Mixes
How did you freeze them? Just put in a tupperwear? Wrap in saran wrap first? Can’t wait to try this, but was concerned about having to make o many pizzas for one dinner. Thanks!
Shirley: I just freeze the dough balls by wrapping them in plastic wrap, then putting them in a ziplock freezer bags. When I want to use them, I put them in the refrigerator to defrost about two days before I need them. On the day I plan to use them, I unwrap the dough balls and place them on a board on the countertop with a towel over them for about two hours to let them come to room temperature. Then, just shape and bake as directed.
Pingback: Food Gal » Blog Archiv » Stuffed on Stuffed Crust at Patxi’s and a Food Gal Giveaway
Pingback: Pizza Dough: Pizza Dough Recipe from FoodGal.com | Pizza Recipes
Oooh, this pizza dough looks so delicious! I will definitely have to give it a try…it will be a great way to use up the odds and ends of rye flour and wheat germ I have in my kitchen! 🙂
Can you make this up in the morning and hold until dinner?
Am curious about Michael’s question, and further, how long one could leave the sponge fermenting until it starts to over ferment/recede? My thought is to make the sponge in the AM, let it sit for the day, then do the rest of the proofing in the evening. Would that work?
Brian: You can make the dough in the morning and stick it in the fridge to slowly proof. Then,, just take it out of the fridge around three hours before you need to use it, and let it sit out on the counter to proof and get to room temperature.
This is an awesome pizza. It takes a bit of time to make but the result is well worth it. Easily the best pizza base and topping I have ever tasted.
Thanks Carolyn! I made this dough in the morning and made the Pizza in the evening worked a treat!
Even had some left to freeze 🙂
I apologize for raining on everyone’s enthusiasm – but the review that Foodgal has provided is completely false. It sounds great, and I wanted to believe it, but I can’t believe that she actually made the recipe. If she did, she wouldn’t have had the results claimed. I have contacted Mozza directly – but no response.
I have tried the recipe five times, following it verbatum and with as much exactitude as I can muster (and I make a lot of different pizza recipes), and it’s a complete fail. When you get to the point where the mixing of the dough “will not pull so much that it completely cleans the bowl” in the standing mixer, it’s actually…..soup. An additional “small handful of flour” doesn’t come close to solving the problem; I have only saved the batch by dumping in another 12 oz (!) to get any semblance of a dough ball (and it’s really not).
As I said, I have contacted Mozza directly, but they don’t respond. I was looking forward to this so much; such a disappointment. This basic proportion of water to flour is widely off the mark.
Brad: So sorry to hear about your frustrations. But I beg to differ — I’ve actually made this recipe three times, without any problems. It is a wet dough, but it never approaches anything like soup. Are you weighing the flour? That’s the best way to do it. This recipe uses more than 6 cups of bread flour with 2 3/4 cups water. For comparison, I just tested another pizza dough recipe from a local restaurant that’s going to be in my upcoming cookbook. That one uses 4 cups of “00” flour with 2 cups of water. So the amount of water in the Mozza recipe is not high by any means. I wish I could help figure out what is going on when you are making it. I hope you’ll give it another try because it really does make a dynamite pizza crust.
Foodgal: Thanks for your interest and response.
Even when I dumped a lot of extra flour in the bowl, it still tasted great. I’m definitely ‘sold’ on the merits of the recipe; I just wish I could do it better (i.e. correctly).
Maybe your response above contains part of the answer: you indicate the recipe reflects “6 cups of bread flour with 2 3/4 cups of water”, while the recipe above shows 22oz of water and 26oz of flour. Yes, I know there is a difference between liquid and dry measure – but that would not account for such a wide difference? 26oz of flour translates to 3 1/4 cups….
I hope your explanation provides the solution, even at the risk of my looking pretty dumb about a basic kitchen skill (I don’t do any baking; I appreciate the importance of accuracy of measurement, but don’t have to practice it).
Again, I appreciate your attention.
Brad: Yes, when it comes to baking, it pays to weigh your flour because a “one cup” measurement of it can vary widely, depending upon if you scoop it straight from the container or stir it up to aerate it, then spoon it into a measuring cup, then level it off with a knife. For things like cookies, the difference might not matter as much. But when it comes to making pasta or bread, it can make a HUGE difference. If you bake a lot or make pizza dough a lot, it is worth investing in a kitchen scale. Just fyi, here is a great chart by King Arthur Flour that will show you how big the difference can be between measuring flour by volume as opposed to ounces. Hope you try the recipe again by weighing out your flour because it really is a fantastic crust. https://www.kingarthurflour.com/learn/ingredient-weight-chart.html
That’s a big, big help Foodgal. As I indicated in my previous post, I ventured on to this site with my question/frustration, knowing that I risked looking like a dummy. Yep, that’s confirmed……
Again, thank you for your help and patience (although I likely gave you and your other readers a nice chuckle for your reading pleasure).
How do I adjust the recipe if I went a 48 ferment? Do I refrigerate right after the second mix? When do I remove from fridge and form balls?
Hi Adam: I think you could just refrigerate the dough for 48 hours if you like, right after you mix the sponge with the rest of the flour with a stand mixer. Depending on how cold your fridge is, as well as how cool/warm your kitchen is, I would take the dough out at least 1 hour before you want to use it. What I like to do is stick the bowl of dough in the oven with the pilot light turned on. I once read that tip in Cook’s Illustrated, and it works great to not only take the chill off refrigerated dough, but get it to proof well. Enjoy the pizza! It’s delicious. 😉