
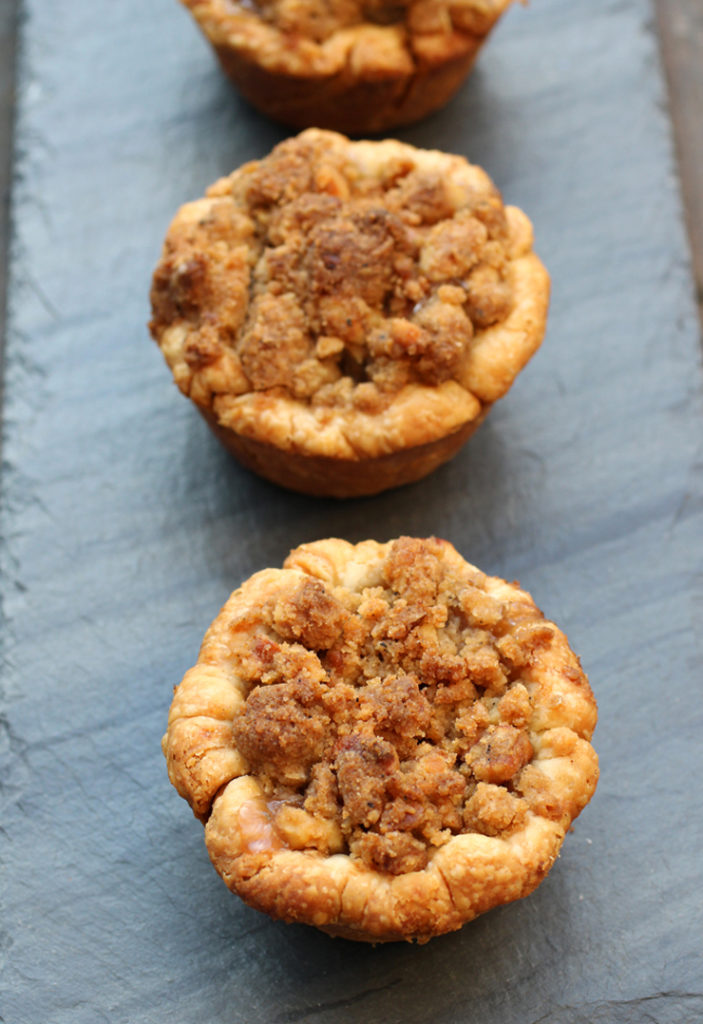
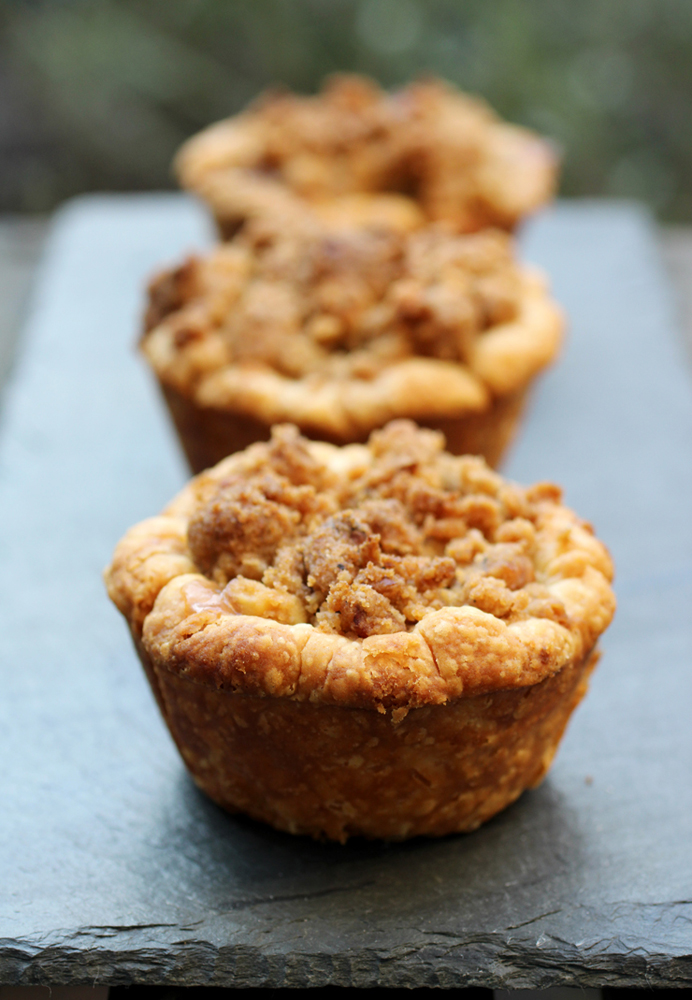
Pear-Rosemary Muffin Tin Pies
These may be little, but they are lethal.
Dare I tell you how much butter there is in these innocent looking “Pear-Rosemary Muffin Tin Pies’?
There are 3 1/4 sticks total.
That’s 26 tablespoons of butter for 10 itty-bitty pies.
(Math majors can be more precise, but that’s a little more than 2 1/2 tablespoons of butter per muffin-tin pie. Although, darn it, when you break it down like that, it doesn’t seem quite so bad. Well, maybe…)
Regardless, I am here to tell you that it is worth the calories and cholesterol to make these beauties.
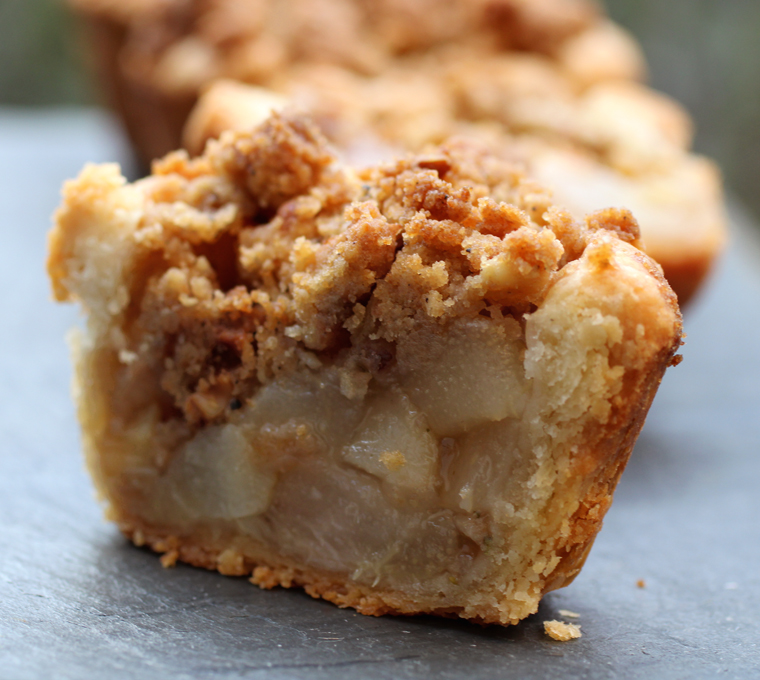
We are talking some seriously flaky, supremely buttery, and moan-inducing, swoon-worthy crusts. They are filled with tender chunks of pears that take on an unexpected perfume from fresh rosemary. The finishing touch is a brown-butter, brown-sugar, walnut streusel top.
This divine recipe is from “The Perfect Pie: Your Ultimate Guide to Classic and Modern Pies, Tarts, Galettes, and More” by America’s Test Kitchen, of which I received a review copy.
Inside, you will find all manner of pies made with all manner of crusts such as “Classic Pie Dough” (made with butter and shortening), “Vegan Pie Dough” (made with coconut oil), and “Gluten-Free Pie Dough” (made with gluten-free flour blend, sour cream, rice vinegar and a little xanthan gum).
Pick your crust preference, then go to work on making everything from “Chocolate Angel Pie” and “Roasted Plum and Mascarpone Tart” to “Nectarine and Raspberry Slab Galette” and “Cape Gooseberry Elderflower Meringue Pie.” Or go small with “Nutella Tartletts” or “Apple Butter Pie Pops” on a stick.
You know any recipe by America’s Test Kitchen has been vetted to the max and includes very specific directions in order to guarantee the perfect outcome.
These muffin tin-pies are no exception. I chose to go with the “Foolproof All-Butter Double-Crust Pie Dough” recipe. It’s easy — and rather ingenious. The flour and butter go into a food processor in two different steps. First, some of the flour, sugar and cold butter get pulsed into a paste. Then, the remaining flour goes in, along with butter that’s been grated, then frozen. Lastly, ice water gets mixed in.
What this produces is a homogeneous dough that still has visible solid, striations of butter throughout. When those melt from the heat of the oven, impeccable flaky layers result.
The other clever hack is microwaving the pear chunks, then draining the resulting juices (you can discard or use in a smoothie later on). That way, you get more fruit packed into every little pie, without excess liquid that can create a soggy crust or dilute the purity of the fruit flavor.
The last trick is using a 12-cup standard-size muffin tin, but leaving the center two cups empty. Because those two positions are the most insulated part of the pan, Test Kitchen experts stated, they failed to crisp up as much. So why bother with them, right? That’s why this recipe uses only 10 of the muffin tin cups.
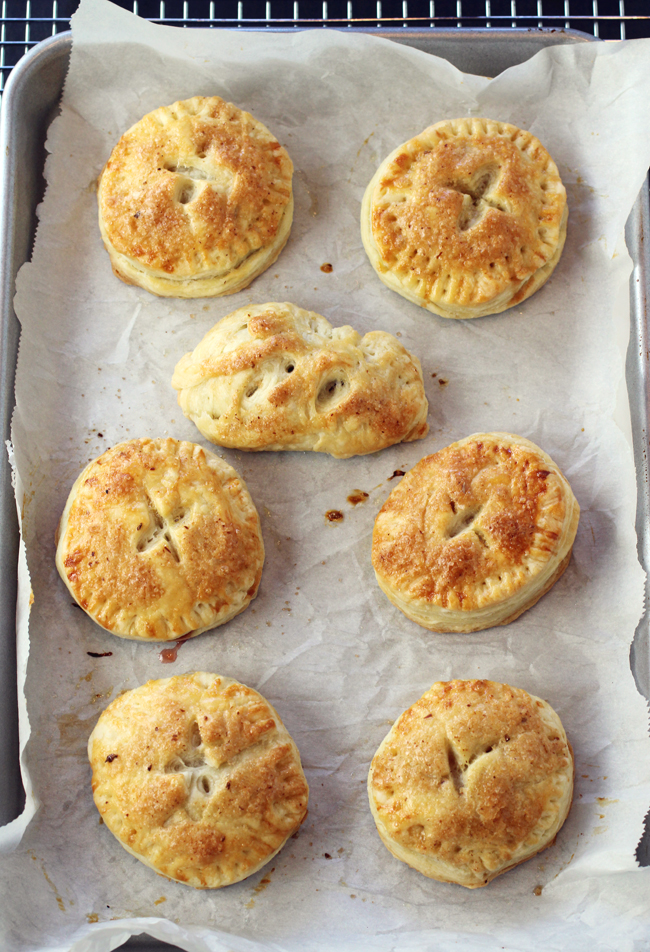
After cutting out the 10 circles of dough, there will be a decent amount of scraps leftover. I gathered them all together into a disk, then rolled it out flat again. Using a biscuit cutter, I cut out smaller circles to make mini hand pies. I plopped some jam or some chocolate chips in the center of a dough circle, wet the edges with a little egg wash, then placed another dough circle on top. I used the tines of a fork to seal the edges all the way around, then a paring knife to cut a steam vent in each, before brushing the top with more egg wash and sprinkling on a little sugar.
I baked these mini hand pies at 375 degrees for 20 to 25 minutes until they rose and turned golden brown.
Yes, an extra treat in addition to the main treat.
After all, it would be a crime to waste one iota of that bodacious, butter-laden dough, wouldn’t it?
Pear-Rosemary Muffin Tin Pies
(Makes 10)
1 recipe double-crust pie dough (see below)
For filling:
2 1/2 pounds ripe but firm Bosc pears, peeled, halved, cored, and cut into 1/2-inch pieces
3 tablespoons packed brown sugar, divided
1/4 teaspoon table salt
1 tablespoon instant tapioca, ground
3/4 teaspoon minced fresh rosemary
For streusel:
2/3 cup all-purpose flour
1/2 cup walnuts, chopped fine
6 tablespoons packed brown sugar
1/2 teaspoon table salt
6 tablespoons unsalted butter
Line rimmed baking sheet with parchment paper. Roll each dough piece into 16-by-11-inch rectangle on floured counter; stack on prepared sheet, separated by second sheet of parchment. Cover loosely with plastic wrap and refrigerate until dough is firm but still pliable, about 10 minutes.
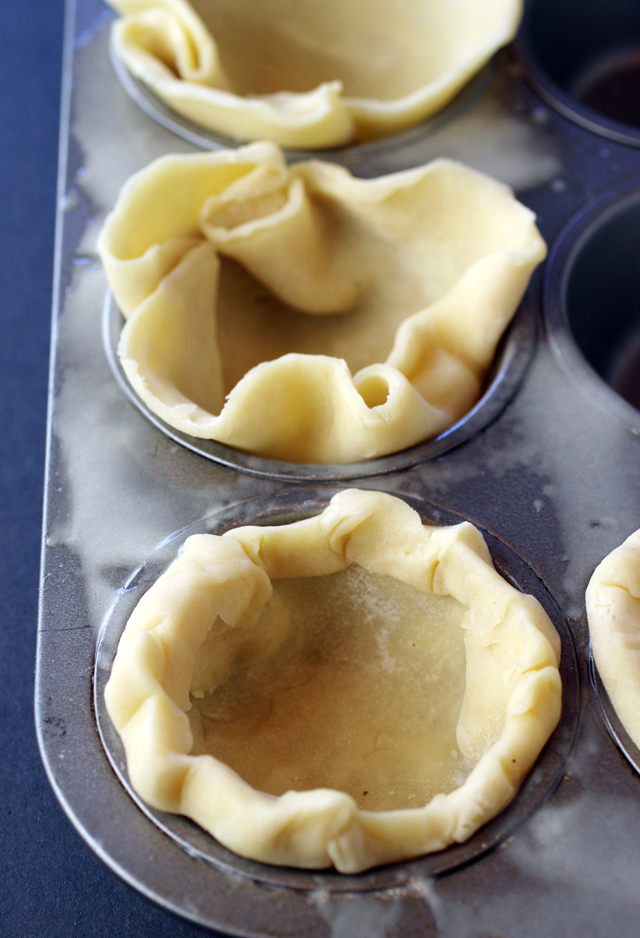
Spray outer cups of 12-cup muffin tin as well as surface in between cups with vegetable oil spray. Using parchment as sling, transfer chilled dough rectangles to counter. Using 5-inch round biscuit or cookie cutter, cut 5 rounds from each dough rectangle. Reserve dough scraps for another use. Return rounds to sheet, still on parchment, and cover loosely with plastic. Refrigerate until firm but still pliable, about 10 minutes.
Center 1 dough round over outer muffin tin cup. Using fingers, press center of dough into bottom of cup, then press dough into corners and against sides, smoothing out any overlapping creases. (You should have about 1/2-inch dough overhanging rim of cup.) Fold overhang over itself; fold edge over rim of cup to rest on surface of muffin tin. Repeat with remaining 9 dough rounds and outer muffin tin cups. (If dough rounds become too soft to work with, refrigerate tin and rounds until firm.) Cover and refrigerate muffin tin until dough is firm, about 30 minutes.
For the filling: Toss pears, 1 tablespoon sugar, and salt together in bowl. Microwave until pears soften slightly and release their juices, 6 to 8 minutes, stirring once halfway through microwaving. Drain pears thoroughly in colander set over bowl; discard juices and return pears to now-empty bowl. Let pears cool completely, about 30 minutes.
For the streusel: Meanwhile, adjust oven rack to lower-middle position and heat oven to 375 degrees. Whisk flour, walnuts, sugar and salt together in medium bowl. Melt butter in 10-inch skillet over medium-high heat and cook, swirling skillet constantly, until butter is browned and has nutty aroma, 3 to 5 minutes. Stir butter into flour mixture until completely moistened.
Whisk remaining 2 tablespoons sugar, tapioca, and rosemary together in a small bowl. Add to pears and toss to combine. Divide pear mixture evenly among dough-lined cups. Sprinkle streusel evenly over fruit, breaking apart any large clumps. Bake until crusts are deep golden brown and juices are bubbling, 35 to 45 minutes, rotating muffin tin halfway through baking. Transfer muffin tin to wire rack and let pies cool for 10 minutes. Run paring knife around edges of pies, transfer to wire rack, and let cool until filling has set, about 2 hours. Serve.
Fool-Proof All-Butter Double-Crust Pie Dough
(Makes one 9-inch double crust)
20 tablespoons (2 1/2 sticks) butter, chilled, divided
2 1/2 cups all-purpose flour, divided
2 tablespoons sugar
1 teaspoon table salt
1/2 cup ice water, divided
Grate 4 tablespoons butter on large holes of box grater and place in freezer. Cut remaining 16 tablespoons butter into 1/2-inch cubes.
Pulse 1 1/2 cups flour, sugar, and salt in food processor until combined, 2 pulses. Add cubed butter and process until homogeneous paste forms, 40 to 50 seconds. Using your hands, carefully break paste into 2-inch chunks and redistribute evenly around processor blade. Add remaining 1 cup flour and pulse until mixture is broken into pieces no larger than 1 inch (most pieces will be much smaller), 4 to 5 pulses. Transfer mixture to bowl. Add grated butter and toss until butter pieces are separated and coated with flour.
Sprinkle 1/4 cup ice water over mixture. Toss with rubber spatula until mixture is evenly moistened. Sprinkle remaining 1/4 cup ice water over mixture and toss to combine. Press dough with spatula until dough sticks together. Using spatula, divide dough into 2 equal portions. Transfer each portion to sheet of plastic wrap. Working with 1 portion at a time, draw edges of plastic over dough and press firmly on sides and top to form compact, fissure-free mass. Wrap in plastic and form into 5-inch disk. Refrigerate dough for at least 2 hours or up to 2 days. Let chilled dough sit on counter to soften slightly, about 10 minutes, before rolling. (Wrapped dough can be frozen for up to 1 month. If frozen, let dough thaw completely on counter before rolling).
From “The Perfect Pie” by America’s Test Kitchen

More Recipes From America’s Test Kitchen to Try: Roasted Mushrooms with Parmesan and Pine Nuts

And: Sauteed Radishes with Vadouvan Curry

And: Hoisin-Glazed Lamb Burgers

And: Modern Cauliflower Gratin

Plus: Rice and Peas
Hi Carolyn,
This looks delicious. I am a novice baker and love to use short cuts. Do you think frozen puff pastry or ready made pie crusts work?
Thank you,
Jill
Hi Jill: You probably could use puff pastry or ready-made pie crust for these. However, if you do own a food processor, it is worth it to try to make this crust recipe. It is so easy because everything is mixed in the food processor. And the technique used — adding the butter and flour in two parts — results in a bakery-quality crust that’s soooo buttery, soooo flaky, and just swoon-inducing. While these tiny pies do take a little time to make, you will be richly rewarded with the results. They are just incredibly delicious. Hope you do try making them. 😉
These mini pies look SOOO dreamy! I believe the taste of these is just phenomenal. Plus, these treats make your house smell fantastic. I’m lickin my lips just looking at these! Get a grip Ann. Get a grip.
Thank u for sharing such a nice idea and all of your useful tips. All of them will surely help me and your readers succeed. Can’t wait to give the recipe a try. Keep the awesome recipes coming!