
Get the Fireworks Started with Dorie Greenspan’s Blueberry-Corn Tart
A dazzling tart topped with blueberries and corn. Yes, corn!
On a recent episode of “MasterChef,” the contestants were initially befuddled when asked to make a dessert using the secret ingredient: corn.
It’s not such a daft ingredient for a sweet, as you might first think.
Sure, we may associate it most with the savory side — grilled corn on the cob, succotash, corn salads, corn chowder and the like.
But I can remember digging into a bowl of corn ice cream and a warm, airy corn souffle at restaurants, and breaking into a delighted smile.
After all, corn is naturally sweet, especially modern-day varieties, which are bred to be higher in sugar.
So last fall, when I finally got my hands on a review copy of the newest cookbook by culinary treasure, Dorie Greenspan, “Baking Chez Moi” (Houghton Mifflin Harcourt), I waited to bake from it. And waited. And waited.
Until fresh corn and fresh blueberries finally came into season, which is now.
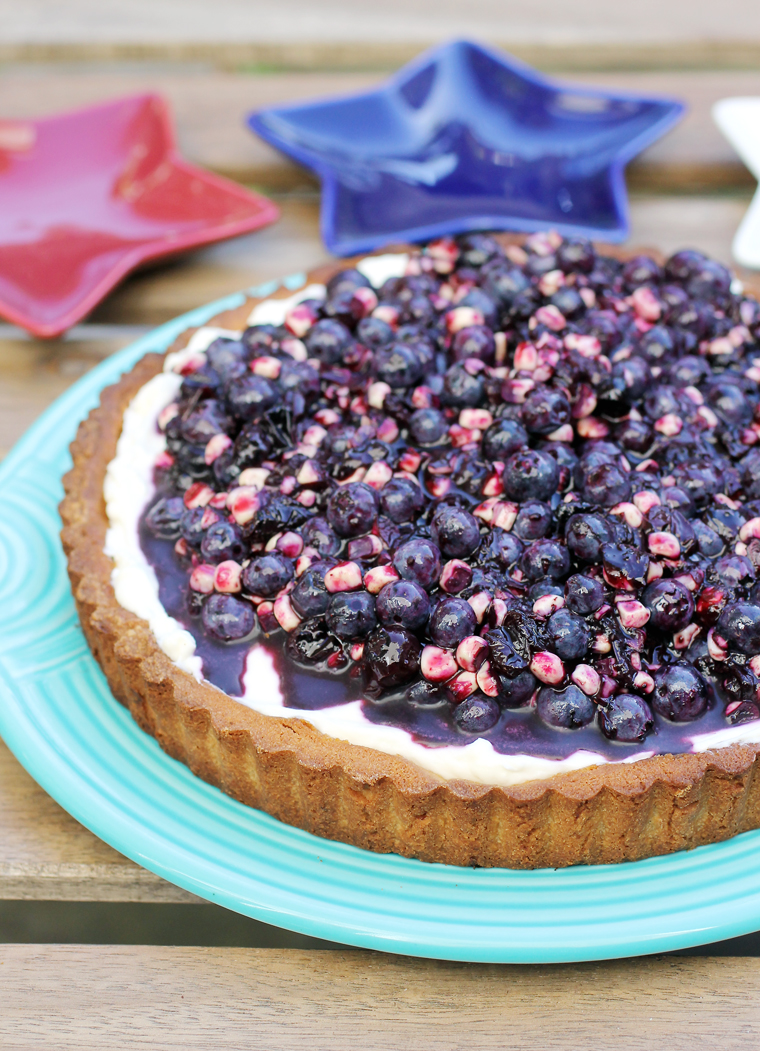
Greenspan’s “Philadelphia Blueberry-Corn Tart” is worth all of that patience.
Imagine a crumbly shortbread-cookie crust mounded with a creamy, honey-scented filling that’s heaped with gorgeous jammy blueberries and fresh corn kernels.
It’s a beaut. A real attention-getter. Just the dessert you want on a summer holiday like the Fourth of July.
It’s like a no-bake cheesecake with a much softer texture, less tang, and not nearly the rich heft.
The topping is stunning to behold, what with its deep purple-fuschia hue with pops of yellow from the corn kernels, which add not only a complementary color contrast, but jolts of lovely crispness.
You cook down some of the berries until they soften and give off their juices, thus creating the jam. Then, off the heat, you fold in more whole blueberries, so you get a saucy mix with plump berries interspersed throughout. What really makes this special is the fresh rosemary sprig added to the jam mixture as it cooks. The forest-y flavor adds a wonderful complexity and keeps the jam from ever tasting too cloying or mundane.
My husband admits he was skeptical about the inclusion of the corn kernels. But after one bite, he was sold. In fact, he liked it so much, he practically ate half the tart, himself, in just two days.
You’ll be won over, too.
Corn in desserts?
Just say “yes!”
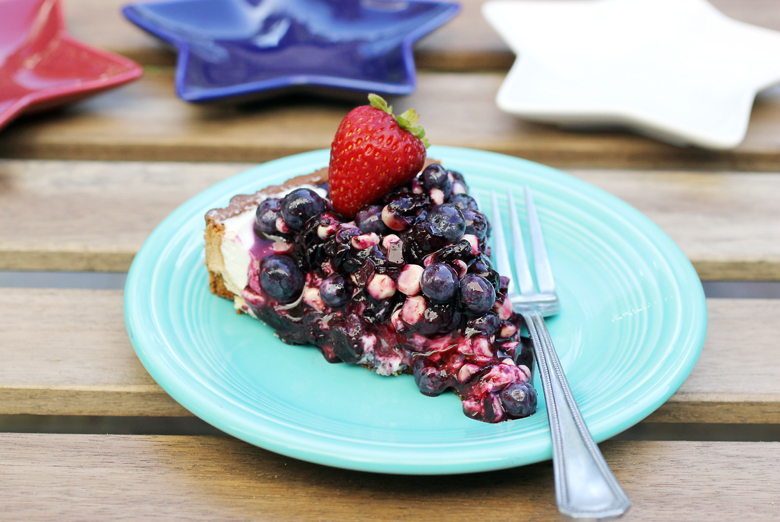
Garnish with a strawberry to have a dessert that’s red, white (and yellow), and blue.
Philadelphia Blueberry-Corn Tart
(Makes 8 servings)
For the topping:
1 1/2 pints (about 450 grams) fresh blueberries
1/4 cup sugar
2 tablespoons water
Finely grated zest of 1/2 lemon
Sprig of rosemary
Squirt of lemon juice
Kernels from 1 ear fresh corn (or 3/4 cup frozen corn, thawed, or canned corn, drained)
For the filling:
1/2 cup very cold heavy cream
1/2 pound cream cheese, at room temperature
1/3 cup sugar
2 tablespoons honey
Pinch of fine sea salt
1 teaspoon pure vanilla extract
2 tablespoons plain Greek yogurt (optional)
1 fully-baked 9- to 9 1/2-inch crust made with Sweet Tart Dough (recipe below)
To make the topping: Put 1 pint of the berries into a medium saucepan with high sides (berries spatter and can be messy), stir in the sugar, water and lemon zest and toss in the rosemary sprig. Put the pan over medium heat and cook, stirring, until the mixture comes to a boil and the berries begin to pop, about 5 minutes. Continue to cook and stir for another 3 minutes or so, until the jam thickens slightly — your spoon will leave tracks.
Remove the pan from the heat and scrape the jam into a bowl; discard the rosemary sprig. Stir in the lemon juice and corn kernels. Put the bowl into a larger bowl filled with ice cubes and cold water and let sit, stirring occasionally, until the topping is cool.
Stir in the remaining 1/2 pint blueberries. (This topping can be made up to 1 day ahead and kept tightly covered in the refrigerator.)
To make the filling: Working in the bowl of a stand mixer fitted with the whisk attachment, or in a small bowl with a hand mixer, whip the heavy cream until it holds soft peaks. If you’re using a stand mixer, scrape the cream into another bowl and fit the mixer with the paddle attachment (there’s no need to wash the bowl); if you’re using a hand mixer, work in a medium bowl.
Beat the cream cheese until it’s soft. Add the sugar, honey and salt and beat until fully incorporated; the cream cheese will be smooth and satiny. Mix in the vanilla and then the yogurt, if you’re using it.
With a flexible spatula, gently fold the whipped cream into the filling.
To finish the tart: Scrape the filling into the crust and smooth the cop — it’s okay if it domes. Spoon the topping over the filling, either spreading it to cover the filling or allowing it to go free-form. chill for at least 1 hour before serving.
Sweet Tart Dough
(Makes one 9- to 9 1/2-inch crust)
1 1/2 cups all-purpose flour
1/2 cup confectioners’ sugar
1/4 teaspoon fine sea salt
9 tablespoons very cold unsalted butter, cut into small pieces
1 large egg yolk
To make the dough: Put the flour, confectioners’ sugar and salt in a food processor and pulse a couple of times to blend. Scatter the pieces of butter over the dry ingredients and pulse until butter is cut in coarsely — you’ll have some pieces the size of oatmeal flakes and some the size of peas. Stir the yolk just to break it up and add it a little at a time, pulsing after each addition. When the egg is incorporated, process in long pulses — about 10 seconds each — until dough, which will look granular soon after the egg is added, forms clumps and curds. Just before you reach this clumpy stage, the sound of the machine working the dough will change — heads-up. Turn the dough out onto a work surface.
To incorporate the butter more evenly and to catch any dry ingredients that might have escaped mixing, separate small amounts of dough from the pile and use the heel of your hand to smear each piece a few inches across the counter. In French this is called fraisage, and it’s the ideal way to finish blending a dough.
To make a rolled-out crust: Shape the dough into a disk and put it between two sheets of parchment or wax paper. Roll the dough out evenly, turning it over frequently and lifting the paper often so that it doesn’t roll into the dough and form creases. Aim for a circle that’s at least 3 inches larger than the base of your tart pan. The dough will be 1/8 to 1/16 inch thick, but it’s the diameter, not the thickness, that counts. Slide the rolled-out dough, still between the papers, onto a baking sheet or cutting board and refrigerate for 2 hour or freeze it for 1 hour. (The dough can be refrigerated overnight or frozen for up to 2 months; wrap it airtight to freeze.)
When the dough is thoroughly chilled, put it on the counter and let it rest for about 10 minutes, or until it’s just pliable enough to bend without breaking. Remove the dough from the paper, fit it into a buttered tart pan and trim the excess dough even with the edges of the pan. (If you’d like, you can fold the excess over and make a thicker wall around the sides of the tart.) Prick the crust all over with a fork and freeze for at least 30 minutes, preferably longer, before baking.
To make a press-in crust: Butter the tart pan and press the dough evenly over the bottom and up the sides of the pan. You won’t need all of the dough if you want to make a thin crust, but I think it’s nice to make a thickish one so that you can really enjoy the texture. Press the pieces of dough in so that they cling to one another and will knit together when baked, but don’t use a lot of force — working lightly will preserve the crust’s shortbready texture. Prick the crust all over with a fork and freeze for at least 30 minutes, preferably longer, before baking.
When you’re ready to bake: Center a rack in the oven and preheat the oven to 400 degrees. Butter the shiny side of a piece of aluminum foil (or use nonstick foil) and fit the foil snugly into the crust. If the crust is frozen, you can bake it as is; if not, fill it with dried beans or rice (which you can reuse as weights but won’t be able to cook after they’ve been used this way.)
To partially bake the crust: Bake for 25 minutes, then carefully remove the foil (and weights). If the crust has puffed, press it down gently with the back of a spoon. Transfer the crust to a cooking rack (keep it in its pan).
To fully bake the crust: Bake the crust for 25 minutes, then carefully remove the foil (and the weights). If the crust has puffed, press it down with the back of a spoon. Bake the crust for another 7 to 10 minutes, or until it is firm and golden brown. Transfer the crust to a cooling rack (keep it in its pan).
A Word on Rolling Versus Pressing From Dorie Greenspan: You can roll the crust out and fit it into the tart pan or just press it in. I roll the dough. Rolling gives you a thinner crust than pressing, so if you press, you might occasionally rind yourself with a little filling left over.
Recipes from “Baking Chez Moi” by Dorie Greenspan
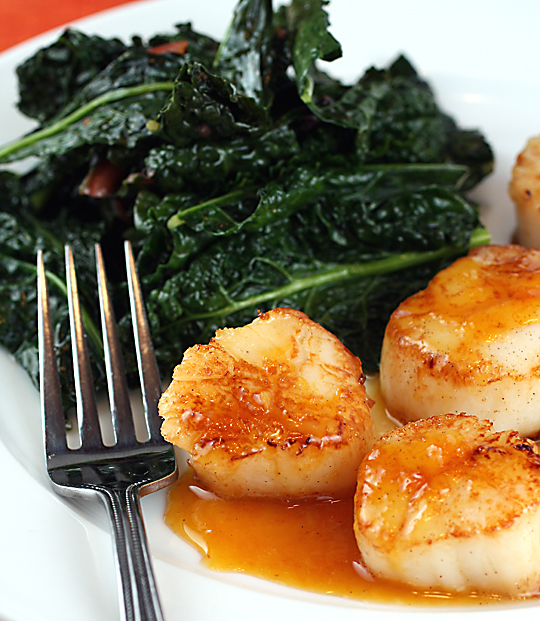
More Dorie Greenspan Recipes to Try: Sardine Rillettes
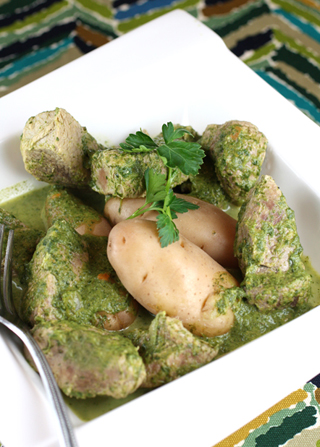
And: Green-As-Spring Veal Stew
A fabulous dessert! I love Dorie Greenspan’s recipes.
Have a great 4th of July!
Cheers,
Rosa
I love corn! But I have to say I’m a bit suspect about it being in something sweet. Still, this looks perfect for the picnic table.
She’s got the best dessert recipes. Love Dorie!!
i was stumped by that challenge myself! i never would’ve come up with something as scrumptious (and photogenic!) as this–bravo!
Such a beautiful tart! Love the intriguing ingredient combination.
Wishing you an early happy Fourth of July weekend!