
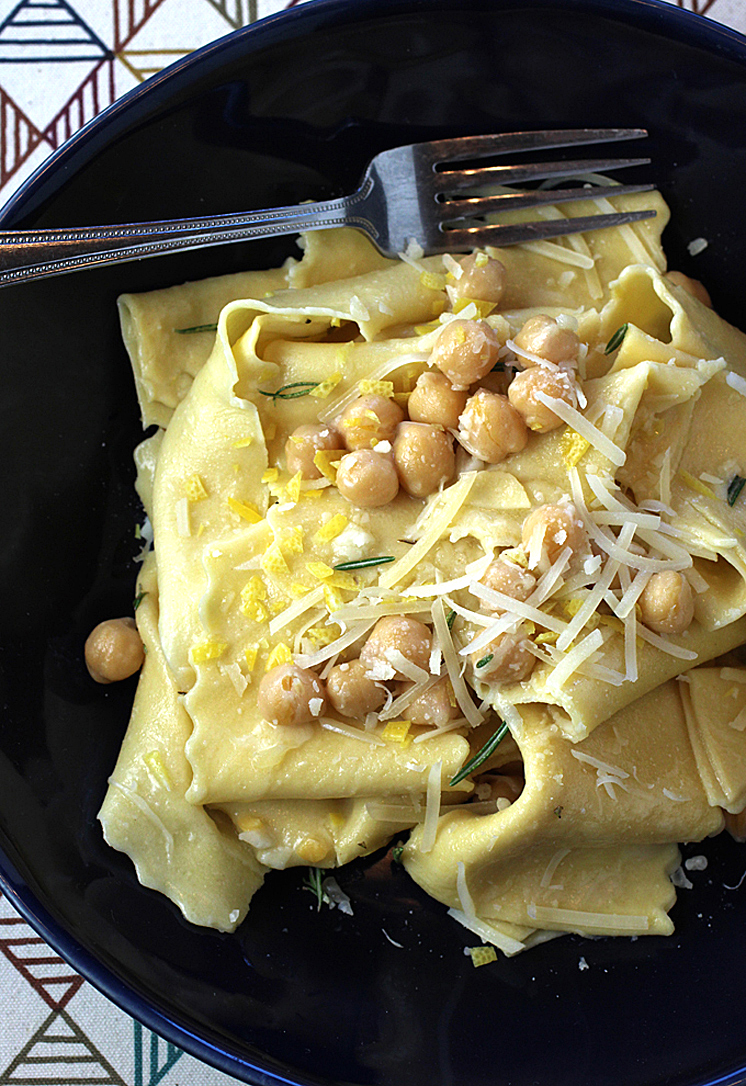
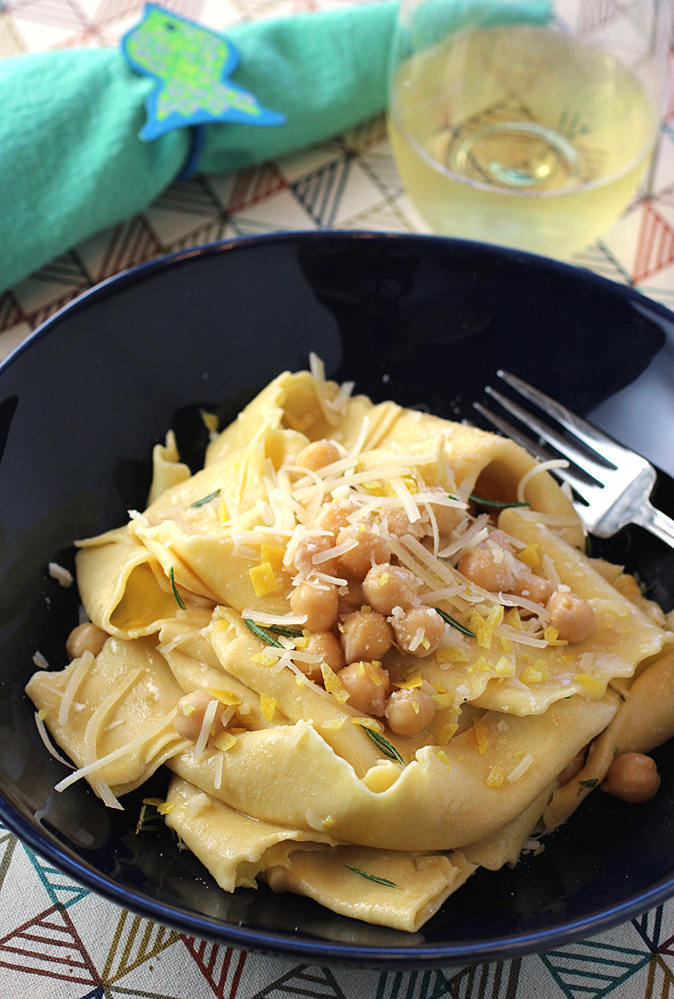
Missy Robbins’ Chickpea Pappardelle with Chickpeas, Rosemary, and Garlic
Even though I can never resist handmade pasta on a menu, it’s only once or twice a year that I actually clear off my countertop and screw in the pasta sheeter attachment on my KitchenAid to make a batch at home, myself.
Because while it’s not a complicated process to make your own pasta from scratch, it is a production.
Like making bread, there’s just no getting around the fact that it’ll take an entire afternoon to make. And that’s just for the pasta, itself. Add on another hour or two for the sauce, and, well, you see what I mean.
So, for my annual — or bi-annual — undertaking, I figured I’d attempt a recipe by a chef with such prowess with Italian food that she’s won two Michelin stars and countless other accolades.
I’m talking about Missy Robbins, the James Beard Award-winning chef-owner of Lilia and Misi restaurants in Brooklyn.
Her book, “Pasta: The Spirit and Craft of italy’s Greatest Food with Recipes” (Ten Speed Press, 2021), of which I received a review copy, was co-written with Talia Baiocchi, founder of the media brand, Punch.
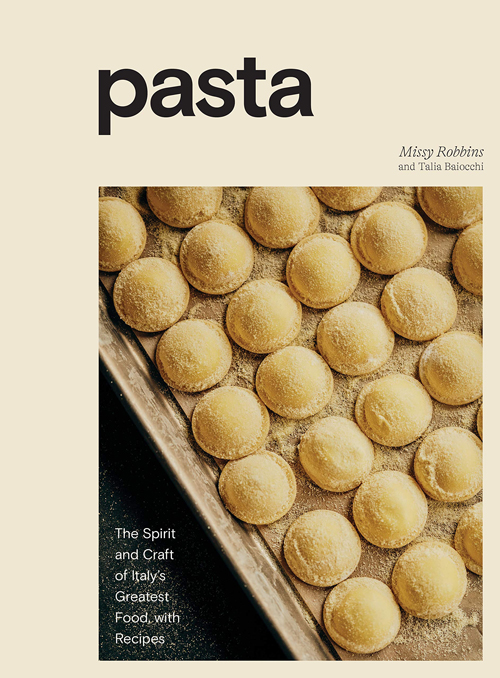
The book will guide you through making most every kind of pasta dough and shape imaginable, and show how to spotlight them in both regional classic and modern classic dishes.
At first glance, the book may seem daunting, because the recipes are long in instructions. But that’s because they are very detailed, along the lines of Judy Rogers’ seminal “The Zuni Cafe Cookbook”.
Trust me, your curiosity will be piqued by fresh pasta doughs that range from “Chestnut Dough” and “Espresso Dough,” to “Cocoa Dough.” And your appetite will long for dishes such as “Cjalsons” (sweet and savory pasta with brown butter and cinnamon), “Spaghetti alla Chitarra con Pallottine” (pasta with Abruzzese meatballs and lamb sugo), and “Proscuitto and Goat Cheese-Filled Cappelletti with Pistachios.”
When it comes to making the fresh pasta doughs, just be warned that you will need a minimum of 24 egg yolks. Yes, two dozen yolks, which of course will leave you with 24 whites. Pavlovas, anyone?
You will also need a scale because the flour measurements are in grams.
I decided to try my hand at “Chickpeas Pappardelle with Chickpeas, Rosemary, and Garlic” because I’d never made pasta using chickpea flour before. I was also intrigued after reading in the intro that Robbins ate a version of this dish every night with a glass of Sangiovese when she was living in a small Tuscan town. She loved this dish so much that she even put it on the menu of her Misi restaurant.
Besides a load of egg yolks and chickpea flour, the pasta dough also incorporates 00 flour. Robbins mixes the dough the time-honored way — on a wooden board with a fortress constructed out of the flour to hold a crater of yolks within. You use a fork to incorporate a little of the flour at a time into the yolks until it all comes together in a mass of dough.
Then, you knead it by hand to activate the gluten. This is a pretty stiff dough, so believe me when I tell you that your forearms and biceps will get a real workout here.
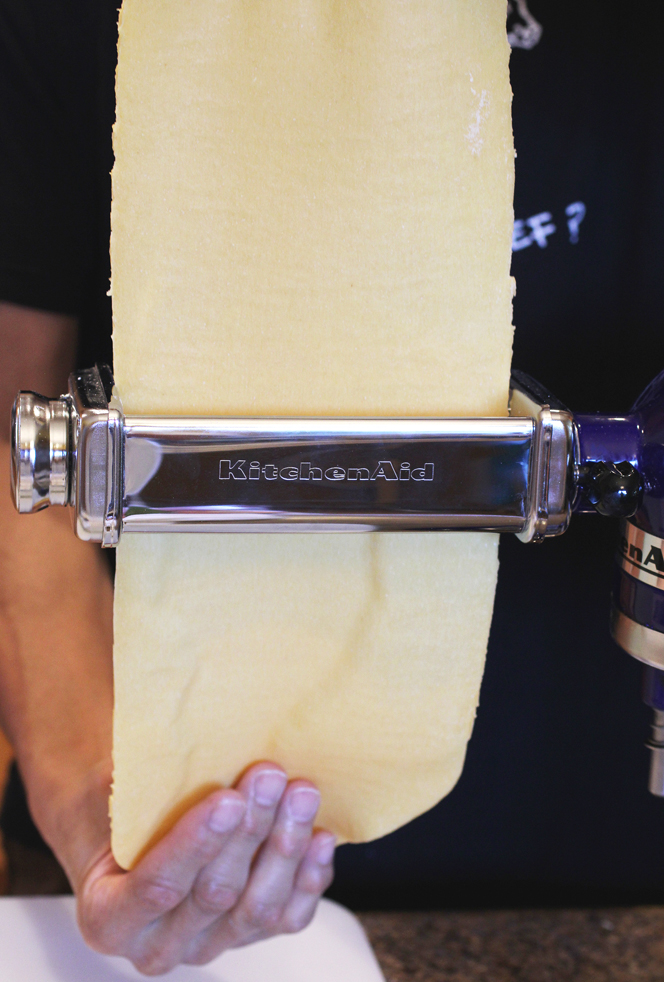
Let the dough rest before cutting it into fourths. One at a time, flatten each one with a rolling pin, then feed through your KitchenAid attachment (or manual pasta maker) on #1 setting a few times, before running it through the #2 setting.
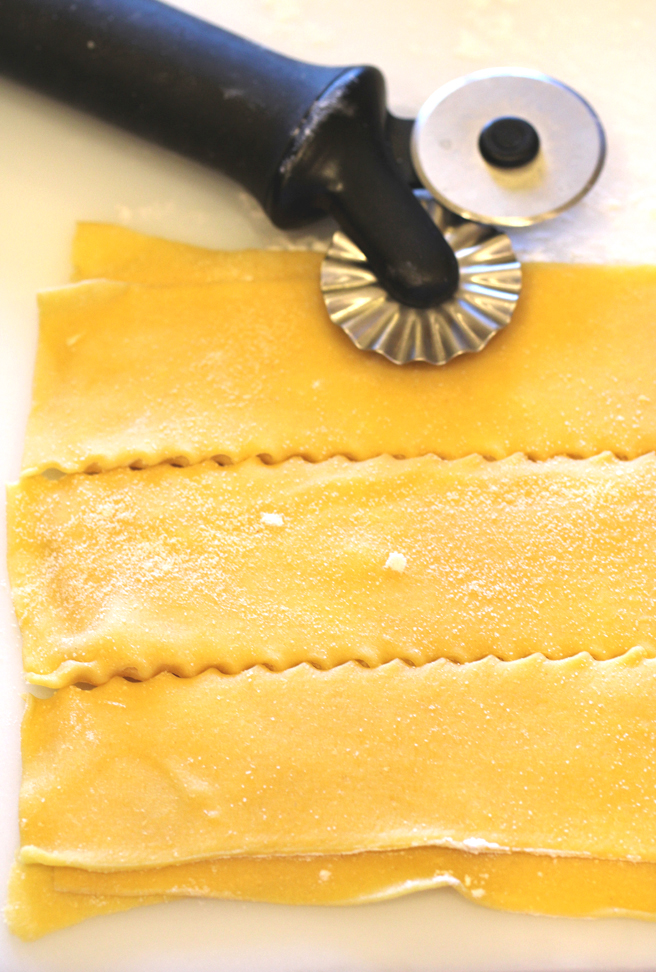
Flour and stack the sheets, then use a fluted pastry cutter to cut pappardelle strips. If you don’t have that, you can always just use a knife.
This process will take time, but the pasta, itself, will cook up in salted boiling water in a mere 2 minutes.
For the rest of the pasta, you’ll cook chickpeas from scratch. You won’t need all the chickpeas that you cook, but you can save the rest in the fridge or freezer to use in salads, soups or stews.
The sauce for this pasta is just the chickpeas, plus garlic, butter, pasta cooking water, and some leftover liquid from cooking your chickpeas that gets emulsified as you toss everything together on the stovetop.
Extra flavor comes in the form of fresh rosemary, Parmigiano, lemon juice, and lemon zest. I love the technique for the zest, too. Instead of using a Microplane to finely grate the peel, you remove it off with a vegetable peeler, then finely chop it with a knife. That results in more distinct pieces with a whole lot more lemon flavor.
This recipe makes a substantial amount of pasta. It says it feeds 4 to 6, but I think it serves closer to 8. It’s a lot. You can even add more chickpeas, if you like, to balance out the amount of pasta.
As such, I think it’s worth it to double (maybe even triple) the amount of lemon juice, lemon zest, rosemary, Parmigiano, and butter in the recipe, so I added those options in the recipe below.
This is a hearty, rustic and austere dish with gentle flavors. The wide pasta is supple with a slightly nutty taste that is amplified by the chickpeas, which are so much more flavorful and firmer in texture when cooked from scratch rather than coming out of a can.
I can see why Robbins loves this dish. It’s not showy or bold in any way. But it exudes a certain comfort, with every forkful leaving you more and more contented.
Chickpea Pappardelle wtih Chickpeas, Rosemary, and Garlic
(Serves 6 to 8)
For chickpeas:
1 pound dried chickpeas
5 cloves garlic
1 large carrot, peeled and halved
1 onion, peeled and halved
1 stalk celery, halved
1 fresh bay leaf
Salt, to taste
To finish:
1 batch chickpea dough (see recipe below)
2 tablespoons olive oil
3 cloves garlic, finely chopped
Peel of 1 to 2 lemons, pith removed and peel finely chopped
2 to 4 tablespoons unsalted butter, cold and cubed
1 to 2 sprigs rosemary, leaves removed from stems, half coarsely chopped and remainder left whole
Juice of 1/2 to 1 lemon
6 to 12 tablespoons grated Parmigiano-Reggiano
To make the chickpeas, place them in a large bowl or pot and over with room-temperature water. The water level should be about double the volume of the chickpeas. Let soak at room temperature overnight.
When you are ready to cook, drain the chickpeas. Place them in a large pot and add water to cover by 4 to 6 inches. Add the garlic, carrot, onion, and bay leaf.
Place the pot over medium-low heat and bring to a very slow simmer. Cook the beans until tender and creamy, 1 to 2 hours. When the beans are three-quarters cooked, season with salt to taste. Remove from the heat and cool.
Drain the chickpeas, reserving the cooking liquid. Measure out 1/2 cup chickpea cooking liquid and 1 1/2 cups cooked chickpeas and set aside. Combine the remaining chickpeas and their cooking liquid, transfer to an airtight container, and store in the refrigerator for up to 5 days for another use.
Remove the chickpea skins that may have loosened (this is tedious, I know, but worth it for a texturally improved final dish).
Finish making your pappardelle (see recipe below).
Bring a large pot of water to a boil over high heat. Generously salt the water.
Separate the papparadelle piece by piece from their neat stacks to ensure the pieces do not stick together. Add them to the water and cook for 1 to 2 minutes, until tender but not soft.
While the pasta is cooking, place a large saute pan over low heat and add the oil. Add the garlic and gently cook until aromatic but without color, 10 to 15 seconds.
Add the chickpea cooking liquid and cooked chickpeas to the pan and stir to combine.
Using tongs or a pasta basket, remove the pasta from the pot and transfer to the saute pan. Turn the heat up to medium. Alternate gently tossing and folding the pasta and sauce together with a wooden spoon for 30 to 45 seconds to marry. Be careful not to move the pasta in the pan too aggressively as it can break.
Add half the lemon peel and gently toss to combine.
Add the butter and continue to toss. If the sauce tightens and you feel a bit of friction in the pan, add a splash of pasta cooking water to loosen it. It should glide when properly married.
Remove from the heat. Add the chopped rosemary, the lemon juice and 2 to 6 tablespoons of the Parmigiano and continue tossing until well integrated.
Divide the pasta into bowls or place on a serving platter. Spoon any chickpeas and sauce left in the pan over each bowl or the platter, adding a splash of pasta cooking water to the pan to loosen the sauce if needed. Garnish with the remaining lemon peel, whole rosemary leaves, and remaining Parmigiano.
Chickpea Dough
350 grams 00 flour, plus more for kneading as needed
160 grams chickpea flour
454 grams (24 to 26) egg yolks
In a bowl, combine the 00 flour and chickpea flour and stir until fully integrated. Turn out the flour mixture onto your wooden work surface and create a barricade with a center sanctuary for the egg yolks that is 5 to 6 inches in diameter but not more. If you create too much space, your barricade won’t be strong enough to contain the yolks as you begin to incorporate the flour. To avoid any additional risk of breaking through your barricade, mix, but do not beat, your egg yolks before adding them to the well. Add half of the egg mixture to the well and use a fork to incorporate the inner layer of flour, stirring in a continuous motion around the circumference to combine. Continue adding the rest of the egg mixture, incorporating the flour as you go. If you bust through your barricade, not to worry. Use your bench scraper to catch the egg mixture and fold it back into the flour, doing this at every edge until you have a mixture that is thick enough to contain itself. Set your tools aside, roll up you sleeves, and get to work kneading. The dough will be sticky at first, so as you work it, continue to remove the dough that clings to your hands and return it to the mass.
The dough will begin to firm up as the gluten is activated by kneading, but if it feels a touch too dry and is not integrating (this can happen when the environment is drier, such as during winter or if you’re working in an arid climate), gradually add about 1 tablespoon room-temperature water to hydrate it. The kneading motion is simple, but it does take some time to get the rhythm right. You essentially want to fold the dough in on itself, pressing down and away from your body to do so. (You can hold the edge of the dough closest to you with your other hand to keep the dough in place as you stretch it away from you.) Rotate 180 degrees, fold, and press again. Repeat this rotating, folding, and pressing motion until the dough is smooth and relatively firm to the touch, 8 to 10 minutes. Use your bench scraper to clean off any pieces of dough that clump and stick as you’re kneading. Lightly dust the board with flour if needed; be careful not to add too much, as it will dry out the dough.
When properly kneaded, the dough should resemble the texture of Play-Doh and should spring back slightly when poked. Cover the dough with plastic wrap and set it aside for at least 30 minutes. This allows the dough to become more pliable. If you’re not forming past until the evening or the next day, place the dough in the refrigerator and remove it 20 minutes before you plan to roll it out so it returns to room temperature. Use the dough within 24 hours.
To form the pappardelle: Cut your dough into quarters so you’re working with smaller, more manageable pieces. Begin with one piece and cover the remaining pieces with plastic wrap. Dust your board and rolling pin with a bit of 00 flour. Roll the dough out to an oval 1/4 to 1/2-inch thick and about 8 inches long. You want it to be thin enough to fit through the widest setting on your pasta sheeter (either a manual one or KitchenAid attachment) but not so wide that it doesn’t have room to expand widthwise as it’s fed through. Feed the dough through once on roller setting #1, gently leading the dough through. Then fold the dough into thirds by bringing one end to the middle and then the other end over the top as if folding a business letter. Lightly press on top to seal and feed one narrow end of the dough through the sheeter again. What you’re doing at this point is essentially rekneading the dough and making sure there is no extra air in it. Repeat the fold and feed at least three times, until the dough is smooth and uniform. Decrease the setting to #2, and feed the dough through again. At this point, the sheet will be long enough to be a bit unwieldy to work with. You can return it to your floured board, cut it in half. Keep it covered with a kitchen towel or plastic wrap while you roll out the remaining dough.
Lightly dust a wooden work surface with 00 flour. Line a sheet pan with parchment paper and lightly dust with semolina.
Lay your sheet(s) of pasta on the work surface. Use a knife to cut 9-inch long sheets, removing the scraps from the unclean edges (save for soup).
Lightly dust each sheet with 00 flour and neatly stack them two or three high. Using your fluted pastry cutter, cut around the edges of the stacked sheets so all of the edges are ruffled.
Beginning at the long edge of the sheet stack, move inward and cut 1 1/4-inch-wide strips. (You can use a ruler or other straightedge to keep your lines even while you get acquainted with the fluted cutter.)
Separate the strips, lightly dust each one with 00 flour, and then return the strips to neat stacks, each 10 to 12 pieces high, and place the stacks on the prepared sheet pan. Repeat with the remaining stacks.
Repeat with the remaining sheets.
Let dry for 20 to 30 minutes at room temperature.
If not using right away, cover the sheet pan with plastic wrap and refrigerate for up to 24 hours.
Adapted from “Pasta” by Missy Robbins and Talia Baiocchi
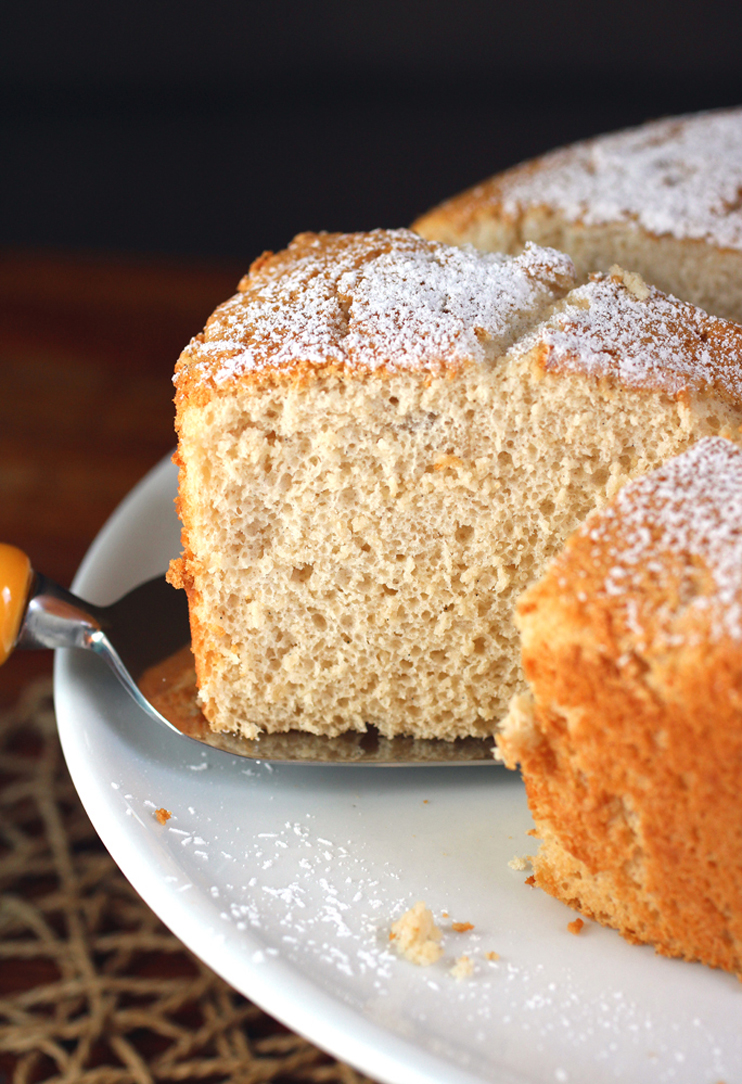
What I Made With Many of Those Leftover Egg Whites: Brown Sugar Angel-Food Cake
It’s been a couple of years at least since I’ve made pasta. Used to be a several-times-a-year thing, but I’ve gotten out of the habit. This looks great! I really like the combo of pasta and dried pulses and legumes, and I’ve also never used chickpea flour in pasta. This will be fun! Thanks.
Hi John: I hope you give it a try. It does take time, but the results are delicious. 😉
Which came first? The chickpea or the egg?
Hi Lynn: OMG, that is just too good! Priceless! 😉